SMSGlobal HubSpot Integration
Take advantage of dynamic messaging functionality directly within your CRM
Enhance HubSpot workflows with SMSGlobal's powerful SMS capabilities. Send from a custom Sender ID and streamline lead management and communication processes with SMS triggers, workflow automation, SMS notifications, and bulk texting campaigns directly within HubSpot.
Create bespoke workflows to suit your unique business requirements by setting up SMS triggers whenever an event occurs. Easily monitor all messages sent and received in Contact Activity, which are automatically logged for optimal oversight.
Before you get started Scroll to Top ▲
- To allow for better tracking of incoming and outgoing messages in HubSpot, use a new MXT sub-account to connect with HubSpot. This will bypass any conflicts with pre-existing contact lists and messages synced in MXT.
- Ensure all recipient numbers are formatted correctly (i.e. Country Prefix/dialling codes). This will ensure messages sent from HubSpot are delivered without interruption.
- Set up the 'Default Country' assigned to your SMSGlobal account in MXT—this is required for the sync and to store internationally formatted numbers.
- Options for your Sender ID (the number that messages are sent from) include Shared Number, Virtual Number or Custom word. If users don't select a value, the message will be sent from a Shared Number by default.
- To enable Virtual Numbers for Hubspot Chat, head to SMS Conversations in MXT (only one virtual number can be enabled at a time).
- All contact-based, company-based, deal-based, and ticket-based workflows in HubSpot will have the SMSGlobal Send SMS action. For more information on HubSpot’s Workflows API, click here.
Connecting your MXT account with HubSpot Scroll to Top ▲
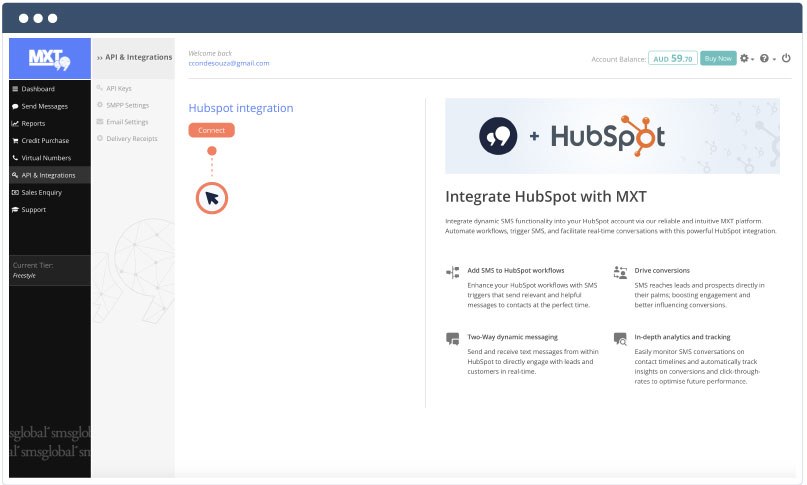
- 1. Login to MXT with your sub-account, then navigate to the HubSpot integration page.
- 2. Click the Connect button.
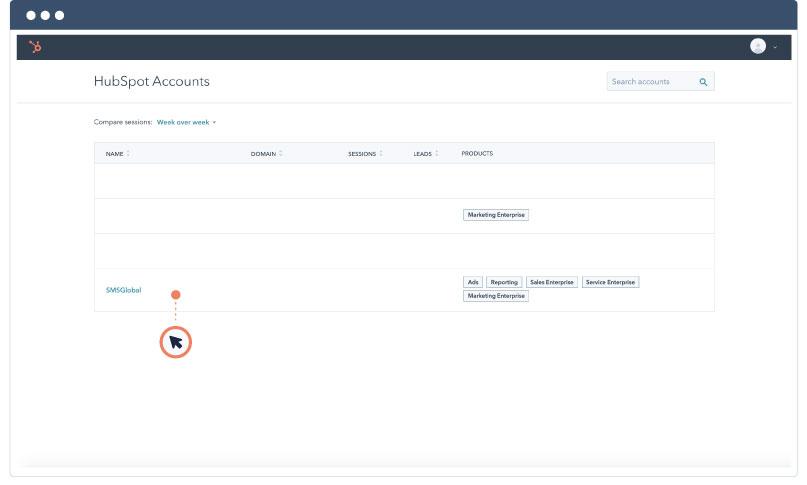
- 3. Select the HubSpot account you would like to connect to your SMSGlobal MXT account.
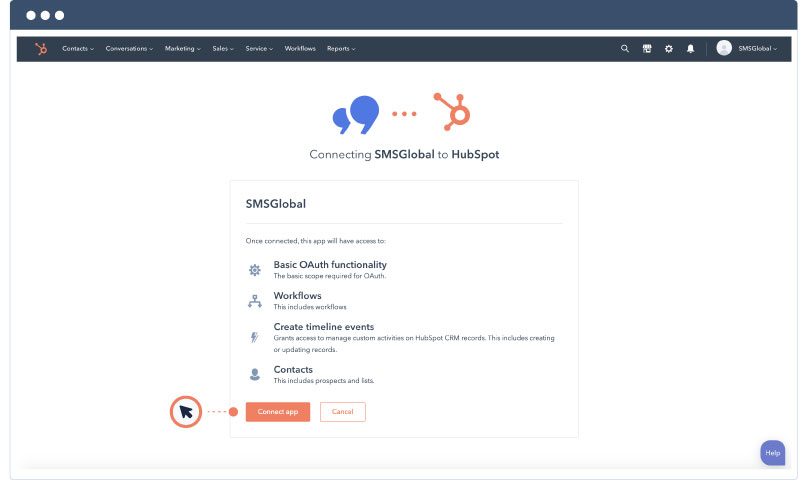
- 4. Click Connect app to grant permission for the SMSGlobal app to connect to your HubSpot data.
Syncing HubSpot contacts to MXT Scroll to Top ▲
Once HubSpot is successfully connected, it's time to sync your contacts.
There are two default phone number fields in HubSpot: Phone Number and Mobile Phone Number. The SMSGlobal HubSpot integration only recognises a single phone number field per contact to send messages to.
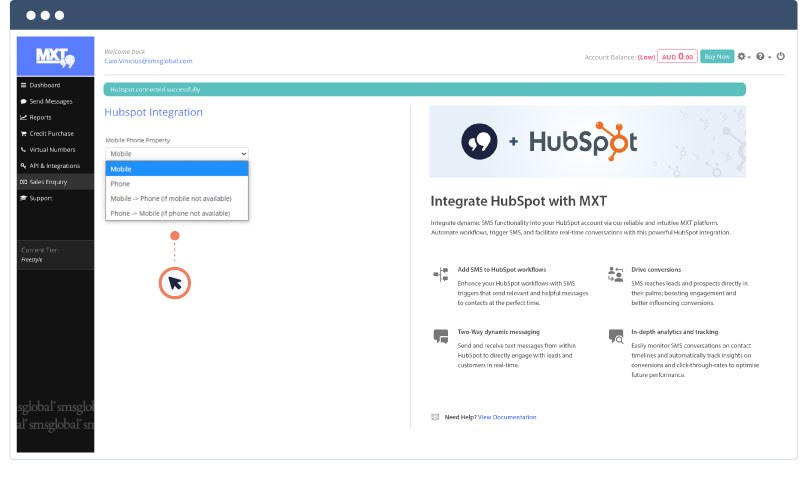
- 1. Select from the below Mobile Phone Properties that will identify the recipient's mobile phone number:
- Mobile: If you select 'Mobile', the integration will send messages to the number from the 'Mobile Phone Number' property.
- Phone: If you select 'Phone', the integration will send messages to the number from the 'Phone Number' property.
- Mobile→Phone (if mobile not available): By default, the message will be sent to 'Mobile Phone Number'. If 'Mobile Phone Number' is unavailable, the message will be sent to 'Phone Number'.
- Phone→Mobile (if phone not available): By default, the message will be sent to 'Phone Number'. If 'Phone Number' is unavailable, the message will be sent to 'Mobile Phone Number'.
- 2. Select your preferred field and Sync.
- a. Once you've made a selection, HubSpot will begin syncing. Synchronisation time will depend on the number of contacts in HubSpot.
- 3. Once the sync process is complete, a completion note will appear with the latest sync time.
Note: Keep your HubSpot Integration up to date by clicking ‘Update Permission’ whenever a new version becomes available.
Resync HubSpot contacts with MXT Scroll to Top ▲
Easily resync SMS contacts with MXT to ensure all contact numbers are formatted correctly. Users are limited to ONE resync every 24 hours. When users add or edit contacts, the HubSpot app stores the international format automatically via web-hooks; therefore resync is not required in this instance.
Send SMS from within Contact Activity Scroll to Top ▲
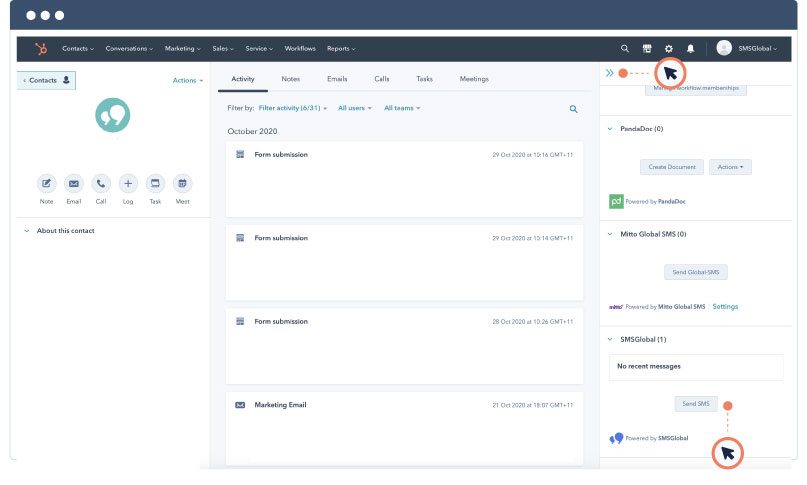
The SMSGlobal HubSpot integration adds a new SMS module to each HubSpot contact record.
- 1. Navigate to the contact profile.
- 2. Open the slide-out menu on the right hand side of the contact screen.
- 3. Scroll down to the SMSGlobal section and click the Send SMS button.
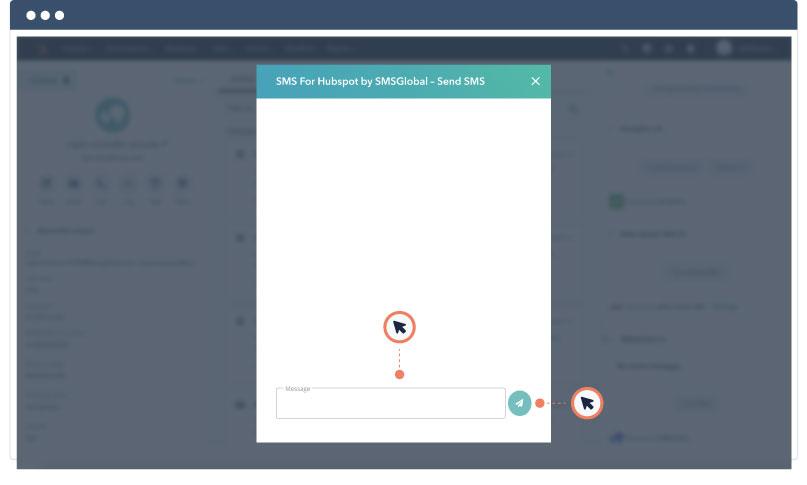
- 4. A popup will appear; fill out each field to configure your SMS.
- a. Enter your message in the message box.
- b. Click the blue Send button.
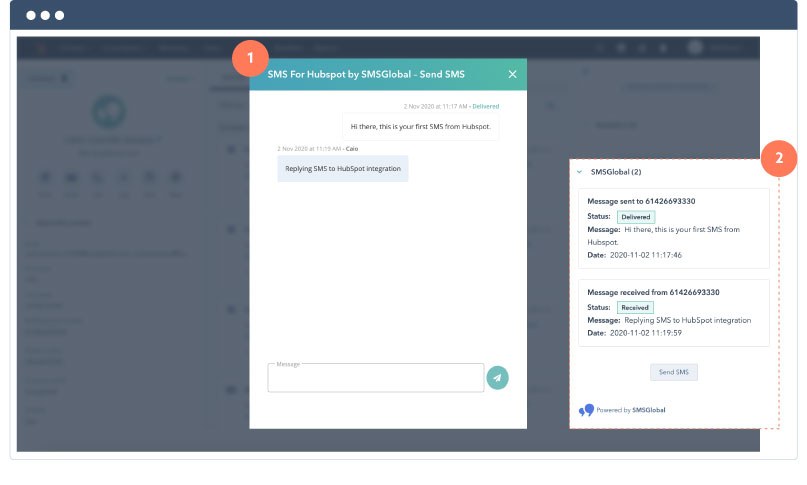
- 5. Once the message is delivered, it is displayed in the conversation box.
- a. Any reply messages from the contact will also appear in the conversation box.
View message history Scroll to Top ▲
Once a message is delivered, it will be displayed in the conversation box. Customers' replies will also be displayed in the conversation box.
The two latest SMS messages sent and received can be viewed on the SMSGlobal drop-down cards.
Automate HubSpot workflows with SMS Scroll to Top ▲
The SMSGlobal HubSpot integration allows users to set up enrollment triggers and actions with SMS functionality. Adding a new Send SMS extension module to your contact-based workflows, easily configure SMS automation to send out custom messages when a trigger event occurs.
Similarly, you can set up enrollment triggers to fire off an action when specific SMS actions occur. Learn more about how to automate HubSpot workflows using enrollment triggers.
Set up SMS enrollment triggers Scroll to Top ▲
SMS enrollment triggers allow users to automate workflows by specific functions including:
- Inbound and outbound SMS
- Message content and keywords
- Delivery time and scheduled business hours
- Segmented recipient numbers
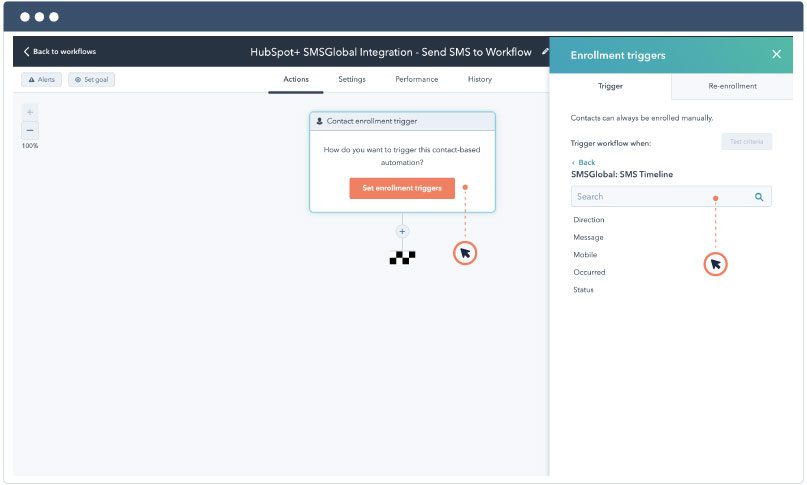
- 1. Click Set enrollment triggers, then select SMSGlobal: SMS Timeline.
- 2. Set up the trigger by selecting from the below properties:
- Direction - set up a trigger for inbound or outbound SMS with "to" and "from" options
- Message - set up a trigger depending on message content (e.g. specific keywords or phrases)
- Mobile - set up a trigger for a specific mobile phone number
- Occurred - set up a trigger depending on the date or time SMS is received or sent
- Status - set up a trigger depending on the SMS delivery status with "sent" and "received" options
- 3. Once you have selected the properties for your enrollment trigger, click Save.
Set up Send SMS as an action for HubSpot workflows Scroll to Top ▲
Once you have selected an enrollment trigger as the first step, you must choose an action to execute in your workflow as the second step. With the “Send SMS” action, you can configure and personalise each message within a workflow by:
- Using the Contact token
- Selecting phone numbers for each contact owner
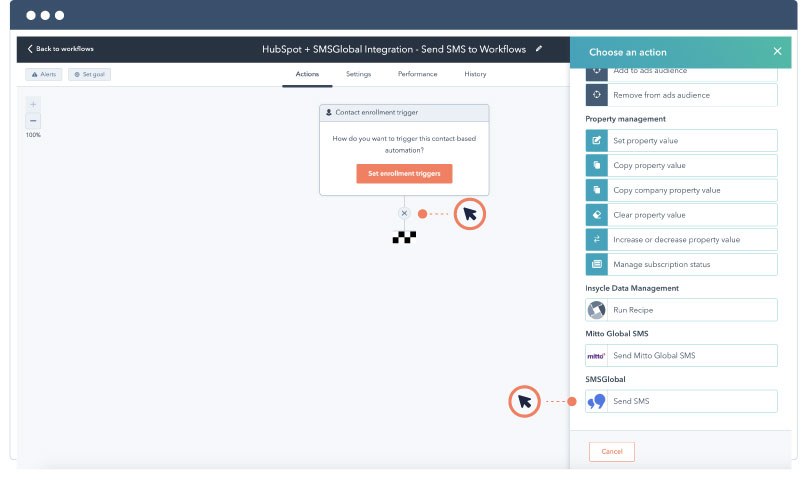
- 1. To add Send SMS as an action, click the "+" icon to open the slide-out menu.
- 2. Scroll down to the SMSGlobal section and select Send SMS
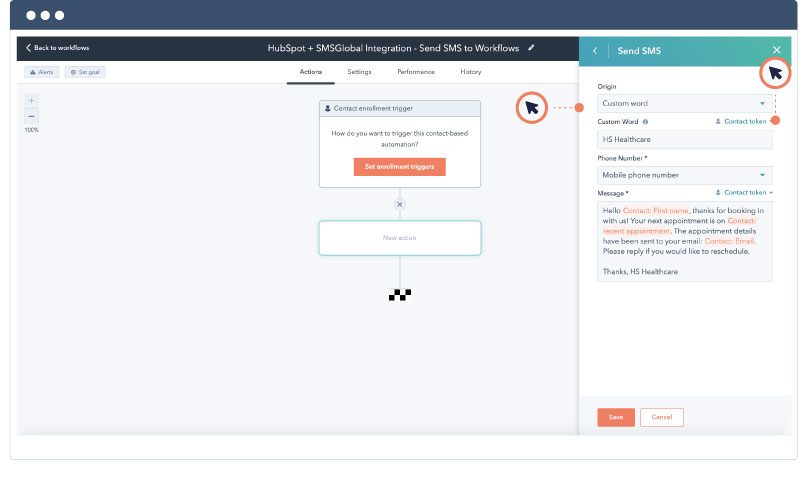
- 3. Fill out each field to configure your SMS:
- a. Sender ID: Select from Shared numbers, Virtual numbers and Custom word.
- i. If users don't select a value, the message will be sent from Shared numbers by default.
- b. Custom Word: If selected, enter the Custom Word value.
- c. Phone number: Select the recipient number property.
- i. Select the contact property for Contact-based workflows.
- ii. Select the contact phone number or contact mobile number for other workflows.
- d. Send to Associated Company: For Deal-based and Ticket-based workflows, select Yes to send to all contacts associated with the company. Otherwise, SMS will not be sent to all associated contacts.
- e. Message: Craft your message.
- i. Include the Contact token to personalise your message.
- a. Sender ID: Select from Shared numbers, Virtual numbers and Custom word.
- 4. Click Save.
How to uninstall the SMSGlobal HubSpot Integration Scroll to Top ▲
- 1. Within your HubSpot account, navigate to Settings.
- 2. Select Integrations on the left-hand side menu, and open Connected Apps from the drop-down options.
- 3. Find the integration you would like to uninstall. Click More and select Uninstall.

- 4. In the confirmation pop-up window, type 'uninstall' in the text box and click Uninstall to finalise the disconnection process.
Once the disconnection is complete (this can take up to 30 minutes), you can reconnect within your MXT account. Navigate to API & Integration > HubSpot and click Connect to begin the process.